This article was last updated on August 29, 2022
MetaMask is currently the most popular and easy-to-use crypto wallet. Many use it as a mediator between platforms and payments. With Cronos being one of the most popular networks, it is only natural that people would like to transfer their CRO to MetaMask. This is exactly why we will be showing you a step-by-step guide on how to add Cronos to your MetaMask wallet for both desktop & mobile.
You can also use this guide to add other networks in a similar manner, once you’ve got the necessary information.
With that being said, let’s get right into it, starting with the guide for desktops.
Table Of Contents
Add Cronos To Metamask: Step-By-Step Guide
Step 1: Create a MetaMask account
If you already have a MetaMask account, you can skip over to the next step.

Otherwise, download the MetaMask extension for your browser. Keep in mind that the extension is only available for Chrome, Firefox, Edge, and Brave. You can click here to get redirected to MetaMask’s download page.
After downloading the extension you will need to create an account. You will see a big “Create Account” button after your extension’s been installed.
One important thing here is that you will be given a 12-word Secret Recovery Phrase, which is essential in case you want to log in to your account, or you forget your password. This is why we suggest writing them on a piece of paper and keeping it safe.
Finally, log in to your account and proceed with the next step.
Step 2: Go to MetaMask’s “Add Network” option

Click on the MetaMask icon in the top-right corner, where your extensions are.
If MetaMask is not there, we suggest you go to your browser’s settings and go to the “Extensions” section. Afterward, you will see the option to make MetaMask pinned to your taskbar.
In the extension, click on “Ethereum Mainnet”, which will open a drop-down menu. At the bottom of it, you will see the “Add Network” button. Click on that.
Step 3: Add Cronos network
Here, MetaMask will require information in order to add the Cronos network. Please refer to the screenshot below for more information, and copy + paste the information beneath.

Network Name: Cronos
New RPC URL: https://evm.cronos.org
Chain ID: 25
Currency Symbol: CRO
Block Explorer URL: https://cronoscan.com/
Step 4: Save Changes

After adding all the necessary information, you will need to click on save.
Afterward, you will have the Cronos network automatically added to the number of options you will have from the “Ethereum Mainnet” menu (also called the Network Menu).
Now that you have the Cronos network added, you will be able to add the CRO cryptocurrency to your MetaMask wallet. Not only that, but you will also be able to send it and use it for other services.
Add Cronos To Metamask: Mobile Step-By-Step Guide
Step 1: Download the MetaMask app and log in
Skip this step if you already have MetaMask downloaded and you have a MetaMask account.
Otherwise, download the MetaMask application through the App Store, Play Store, or Google Store on your iOS or Android device. After that, the application will automatically install.
Open the application once that happens and click on “Create a New Wallet” or log in if you already have an account. Keep in mind that by clicking on the create a wallet option you will need to write down the 12-word Secret Recovery Phrase, essential for recovering your MetaMask wallet.
If you already have an account you can log in.
Step 2: Tap “Settings”

Now that you are inside the MetaMask application, you need to go to the “Settings” section. This can be done after tapping the top-left icon, as shown on the right.

This will open a whole menu on the left-hand side. In there you need to click on the “Settings” menu.
Doing so will reveal the next section, where you need to click on “Networks”.
Here, you can also find a whole bunch of settings regarding MetaMask, in order to customize your experience.
Of course, this includes adding a new network.
Step 3: Add Cronos network
Click on the “Add Network” as shown in the picture. This will take you to the page where you will need to add all of Cronos’ details.

Step 4: Add Cronos Network Details
Once you click on “Add Network” you will have to manually enter the Cronos network details. They are identical to the ones shown in the desktop version of the guide. You can also find the details below the image.
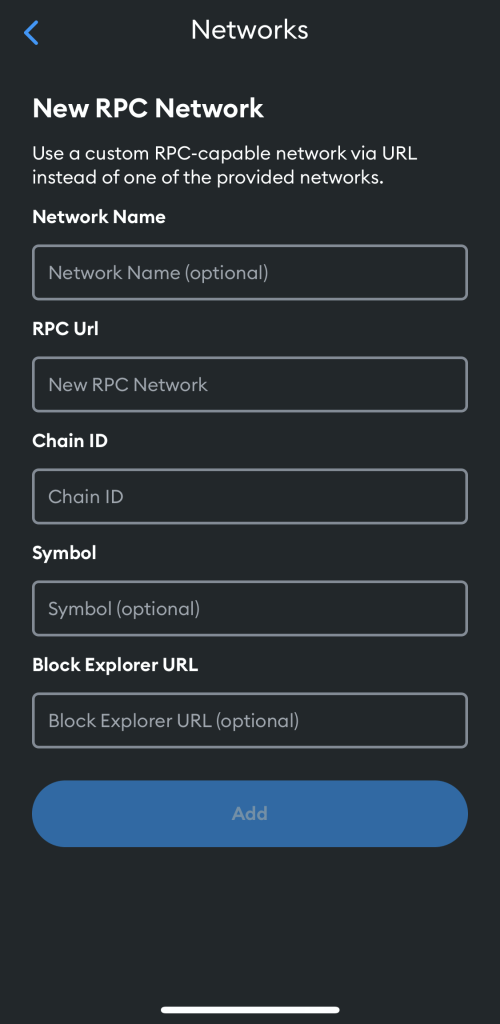
Network Name: Cronos
New RPC URL: https://evm.cronos.org
Chain ID: 25
Currency Symbol: CRO
Block Explorer URL: https://cronoscan.com/
Step 5: Save Changes
Afterward, you can click on “Add” and you will see the Cronos network added to your MetaMask account. This will allow you to send and receive CRO, which you can also use to pay for any third-party services.
Add Cronos To MetaMask – Summary
Time needed: 5 minutes
Here is how to add the Cronos network to your MetaMask wallet.
- Download MetaMask Wallet.
You can either download the desktop browser extension or the app for mobile.
- Create a MetaMask Account.
Create your MetaMask account and log in.
- Click on “Add Network”.
Click on “Add Network” within the extension, by going to the “Ethereum Mainnet” menu or by heading to “Settings” on mobile.
- Enter the Cronos Network Details.
You will need to enter the Cronos Network Details, which are the following:
Network Name: Cronos
New RPC URL: https://evm.cronos.org
Chain ID: 25
Currency Symbol: CRO
Block Explorer URL: https://cronoscan.com/ - Click on “Add”
Clicking on “Add” will make the network available in your MetaMask wallet. You can switch back to Ethereum Mainnet whenever you want through the drop-down menu,
What Is Cronos
Cronos (CRO) is the native cryptocurrency of the Crypto.com exchange. It is quite popular nowadays, so much so that it never leaves the top #20 cryptocurrencies by market cap.
The Cronos blockchain is one of the products, part of Crypto.com’s incentive to rev up the global adoption rate of virtual currencies. This includes the idea of giving full control to a person regarding their own finances, as well as safeguarding their data and identity.
CRO has a lot of utility within the Crypto.com exchange, while also being the primary power source. For example, you can easily stake your CRO with the click of a button on the Crypto.com payment application. This results in a potential 10-12% annual return.
The token is also useful to reduce the transaction fees you might have during trading.
A unique feature within the same application is the fact that you can receive up to 20% cashback by paying for services within the CRO network. Additionally, there is a 10% cashback for purchasing gift cards and making peer-to-peer (P2P) transactions.
Is Cronos A Worthy Investment?
We assume that you are new to the Cronos cryptocurrency since you’ve read up until now. At this point, you are probably wondering whether to invest in CRO or not. Well, that is a great question to have. Let’s try helping you out.
For starters, Crypto.com is currently one of the biggest and most popular exchanges on the market. Some of its competitors include Binance, Coinbase, FTX, and others.
ALSO READ: “Bitcoin (BTC) Price Prediction”
To give you an example of how big Crypto.com is, the company took a commercial slot during the Superbowl 2022. This took the popularity of the exchange and its network to a whole new level.
As of May, CRO is worth around $0.20, which is far away from its all-time high of $0.90. However, we must take into consideration the current state of the market. We are currently experiencing a huge crypto dip for too many reasons to fit within this article. The main one is, of course, the price of oil, due to the ongoing military conflict between Russia and Ukraine.
Yet, let’s think about CRO after the issues settle down and the market regains its previous “power”. During these times, the price of cryptocurrencies, in general, will start going back to normal. Right now, we can easily see that most crypto networks are undervalued.
Naturally, this includes CRO as well. This is why we believe CRO is a good asset, including the fact it has so much utility within the Crypto.com network. If the exchange keeps seeing the adoption rate, so will the price of CRO increase. It is as simple as that.
However, there’s also the chance that we see strong crypto regulations, which will slow down the market’s regrowth dramatically. Although this is highly unlikely, we can never properly predict the crypto market in the short-term.
If you believe in the power of cryptocurrencies, then you should consider adding CRO to your portfolio, as it is a strong virtual asset to have.
How To Buy Cronos – eToro
Follow these simple steps to purchase Cronos on eToro. We suggest using eToro as it is the easiest and fastest way to purchase cryptocurrencies such as CRO.
- Create an account
Creating an account on eToro is easy. Download the app or open the official website. Click on “Create account”. You will need to provide your names, email, think of a password, etc. and you can then log in. - Verify your account
Once you manage to log in you will need to provide personal information such as a photo of your ID, utility bills, etc, which can help prove your identity. Once you provide that information, the dedicated team at eToro will review it. If everything’s fine, your account will be verified within a couple of days, although it takes no longer than 12-24 hours. - Fund your account
Now that your identity’s been verified, you will need to add funds to your account. Click on the “Deposit” button. In there, you will be asked to link your card or make a direct transaction. Choose the appropriate option and select an amount you want to add. - Buy CRO
After you’ve funded your account, you can use the eToro search bar to look for CRO. Click on the option and you will be led to the dedicated Ripple section. In there, click on the “Trade” button. Select the amount of XRP you wish to buy and confirm the transaction. Doing this will make you a proud owner of XRP. You can also use the buttons in this article, which will transfer you directly to the appropriate page.
Final Thoughts
Although adding Cronos to your MetaMask wallet is a manual task, it is actually quite easy to do. Hopefully, the images did not make the process seem longer than it is. With that being said, we assume that you now have Cronos as part of your MetaMask networks.
If you want to switch back to the Ethereum network, you can do so by using the same drop-down menu. In this case, it will no longer say Ethereum, but Cronos. Click on Cronos and it will show you Ethereum available as well. Choose the option and you are back to the default state of MetaMask.
Of course, you can easily switch back to Cronos as well.
Read Next: “Is Apecoin (APE) A Good Investment Opportunity Or NFT Hype?“